

Phipps Explains Pouring High-Precision Construction Grouts
Posted by Matt Milos on Jan 14th 2019
While pouring grout may be simple in light applications, your method can have a massive impact on larger projects.
When your grout is what secures bridge columns or keeps a compressor in place errors can be catastrophic. Your method truly matters if you want to avoid costly and dangerous mistakes. Nothing teaches like experience, but these general guidelines are a great starting point for putting work in place properly. In this article we are focusing on applications where the grout serves as an intermediary between concrete and the base plate of a large piece of equipment or support-beam/column.

Diagram courtesy of BASF.
When and How to Set the Base Plate
We strongly recommend attaching the plate first and then pouring between it and the concrete. Pouring first and then securing the plate puts you at risk for uneven setting.
After pouring the grout tighten the plate bolts to increase pressure and improve the grout's strength. Be sure to lightly coat the bolts with wax before pouring so that they do not crack the grout when you tighten them.
Minimum and Maximum Depth
Most cementitious grouts need 1" between the concrete and the plate, while your average epoxy grout needs 2" or more. Without enough space grouts will struggle to flow through and fill the space, leaving an inconsistent amount of support. With small surface areas it isn't quite as critical to observe these minimums as the grout doesn't have very far to travel in the first place.
On the other hand, most grouts cannot go deeper than 6", though this is a bit of an arbitrary number. Maximum depth has more to do with volume than it does two-dimensional depth. Generally, however, pouring grout into a space deeper than 6" can lead to cracking. When grout sets it produces heat, and a large amount of grout in a confined space can in some cases explode because of too much heat. If you absolutely have to pour deeper than 6", adding pea gravel* or doing multiple pours can, in some cases, compensate for volume issues.
Remember that these grouts are engineered for specific situations. Contact Phipps for a recommendation if you are unsure of what kind of grout to use.
(*applies to cementitious grout only.)
Pouring Direction and Increasing Flowability
Pour from one direction only. Pouring from multiple sides can create air pockets that reduce the support of the grout. If the grout is having trouble flowing through the space you have a couple options to assist it. With cementitious grout you can adjust flow by adding water to the mixture. Always check the maximum water content recommended by the manufacturer before adding water. Exceeding the maximum will compromise the grout. The only way to change flowability with epoxy grouts is to reduce the amount of aggregate in the mixture. If neither of these solutions work, you may use metal banding straps to draw the grout through the space to the other side, but trying to use other tools may move the aggregate and distribute it unevenly.
Formwork and Headboxes
Before pouring make sure your formwork is water-tight. When using epoxy grout coat the formwork with wax or some other product to prevent it from sticking to the grout. Contractors have even been known to effectively use duck tape on their form work for this purpose. But what about measurements?
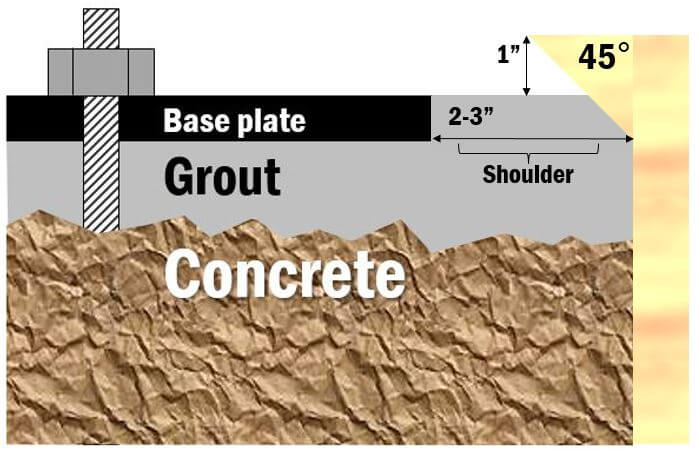
Form shoulders for 2"-3" horizontal clearance from the plate and 1" clearance above the plate (2" for epoxy). These measurements, combined with 45° chamfers, help evenly distribute the pressure of the plate onto the grout and concrete. 90° edges often lead to cracked and damaged shoulders. Shoulders over 3" in width need to be secured with rebar spaced throughout the shoulder.
Though this may not be as much of an issue if you are pumping, you should always use a headbox if you are manually pouring grout. A headbox helps the grout flow smoothly and quickly under the plate with minimal spills outside the formwork.
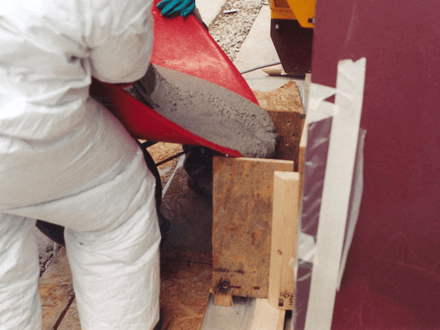
Use a headbox to maximize flow and reduce spilling.
It's always important to put work in place correctly. Questions? Contact us to get expert advise on high-precision grouting.
Phipps carries a full line of high-precision grouts from BASF, Sika, and more.